Tuesday, December 28, 2010

Knits! This Time A Dress...


Back in October when I was up to my ears in Halloween costumes I cut out a knit dress. It's pattern McCall's 5379.

I used the bodice of C and the waist of A. And it was pretty easy, whipped together in a snap. I only ran into problems on the chest. Basically I have NO chest and my dress form does, so when I put it on it was pretty big in the up top, if you know what I mean.

I think I'd like to tackle the pattern, or another like it. But this time I'll be sure to use a ball point needle that corresponds with the weight of the fabric. I didn't this time. Partly because I didn't know I needed to, and partly because I started the project at midnight. Where does one find a ball point needle at midnight? You don't, so I forged ahead and learned my lesson.

This dress has yet to see the light of day. But I'm hoping to bust it out of my closet, soon.

Friday, December 24, 2010

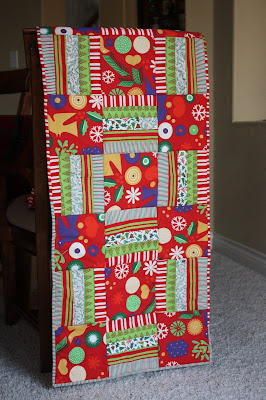
Run Run Rudolph Table Runner


Right now it feels like we're all over Christmas. But when I was stitching the finishing touches on this gift I was still filled with sugar plum fuel and happy thoughts. When the no-retail rule came to reside in our family gift exchanges I was in a panic. But turned out a small-ish quilt to be used on the table for Christmas feasting. Actually could be hung on the wall for decoration is you were so inclined.


For the label I embroidered right into the back piece, as I tend to do for all my quilt signatures. But this time I used metallic thread. It was actual metal. Imagine embroidering with a guitar string. Lesson learned.

Every time I finish a quilt remember how much I love hand sewing a binding.

Wednesday, December 22, 2010

Over the Shoulder: Campus Carryall for Tweens

There comes a time when you've worked with a fabric in so many ways and so many times that you know exactly how to cut it, how to lay a pattern to it, how to use it. I think I'm there with my Laurie Smith stash. It's at the tail end. Honestly, not sure it has another piece in it. So it was the natural go-to material for a recent pair of totes I was making.


The annual making and distributing of the babysitters' gifts. Last year I went with something you could put a loaf of bread in, and not much else. This year I took inspiration from the styles I was seeing in NYC and whipped these up. There are mismatched fabrics because I don't have much left. But I love the effect, and I knew I would because I have loved everything I've made with these fabrics. Perfect weight, great prints, nice quality. I'm sad they are almost gone.


These are gifts, but a custom version is going in the shop. So if you want one, go order one in the colors you like.

Sunday, December 19, 2010

Wild Stockings, II


Finished two more of those fun stockings in fresh colors and whimsical details.

Tuesday, December 7, 2010

Wild Stockings


Wild Christmas stockings in tones of aubergine, lime, cotton candy pink, vibrant blue and chocolate are made with durable and washable cotton fabrics and trims. Designed to match the ornaments Target released last year and this, these bright colors shock your traditional Christmas ideas into overdrive.

Oh, and one more thing, they are washable! Yes, I know your babies can get crunchy candy cane slobber on their stockings -- been there -- so if these get mussy just hand wash them in cold and line dry (or have dry cleaned). Use warm iron if necessary.

If this is too much punk for your family stocking set, think of these for college kids, newlyweds, and gift bags (yes a bottle of wine fits in there).


Saturday, November 27, 2010

Lead Free!


So you care about Mother Earth, and you use reusable shopping bags at the grocery store to avoid polluting the planet with countless plastic bags. But recently, you may have discovered that your current shopping bag is made with potentially harmful lead. What’s an environmentalist to do?

Get this slim, fashionably designed tote. The contrast colored handles bedecked with houndstooth ribbons make this tote environmentally friendly and truly a great value. I thought custom market totes were on their way out. Then, the breaking news that the mass-produced ones had the possibility of being dangerous hit. Now I know totes are here to stay. They are great as presents or for your own personal lugging around. This budget tote looks expensive and is made from 100% cotton in home dec weight and has strong handles with reinforced stitching.

Simple interior, 3-compartment pocket keep mobile and keys within reach.

Approx. Dimensions: 15" x 15", excluding handles.

Saturday, November 20, 2010

Weekender


Roomy enough for an overnight bag, stylish enough for your daytime carryall. The great thing about this stylish case is that it's very light. If you have to put in the overhead, it won't hurt your back, unless of course you packed the kitchen sink.

Fabric is a little uncommon, two fabrics from the same season and designer... but different lines. The pinks and yellows are exact matches. But the pink bubble fabric introduces some burgundy and sage. I'm happy with the combination -- but you know I like surprises. The interior layer is quilted this time around. I also changed the handles to be longer -- earlier versions are a little hard to sling onto your shoulder. I also made them with welt so they are soft and a bit more comfy than past models.

Kept the exterior side pockets, which really are perfect for essential items like your handheld or the car keys.

Additional Information:
Heavy-duty brass zip closure. Bag measures about 22"L x 6"W x 14"H. Handwash or dry clean recommended.

Friday, November 12, 2010

Wedding Gift of The Year

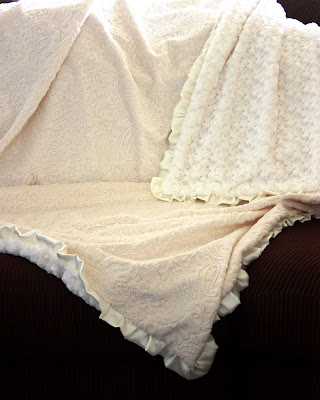
Some folks think that cutiepetutieoriginals.com is just for babies. Wrong! Sophisticated, stylish, and so so so so soft.

Look at these amazing blankets designed for a couple to snuggle under at 60"x60". They truly are the perfect wedding gift or housewarming gift for a young couple. And don't forget your college kids, this is perfect for warming up those dorm rooms!

More mature patterns, but still fun and whimsical. Get yours now!


Wednesday, November 10, 2010

The Leftovers Must Go Somewhere, II


I made an insane amount of bias tape for this project. I get carried away when it comes to bias tape. And it had to go somewhere, right? It's too cute not to do something with it.

Then I read this blog, African Kelli, and cringed because I knew she was somewhat speaking to me and so many others who are faithful fans but have just not sewn from the book we all bought months ago. (This is an excellent sew along, but I have been way too busy to really sew with them this year.)

So, with the freedom they "assigned" to this month's challenge I flipped through my crisp new book that has literally collected fuzz-dust. With an eye toward fulfilling my Christmas shopping/gift list I settled on pp. 83, The Sewing Tools Trio. I'm telling you right now I would have none of the trio business, because I am WAY too busy for that. But the sewing machine cover was a very good choice for me. More specifically my mother-in-law because I happened to use her machine on a recent trip and know for a fact that her current cover is disintegrating. She has the same machine that I have so I felt confident that if I made the thing to fit my machine it would fit hers and I jumped right in. I also hope she doesn't read this blog or she will know what she is getting for Christmas.

Anyway, I jumped right in to changing the pattern. I like the cover featured, but I like to have a handle hole. I also knew I needed an extra pocket for the monster instruction manual that comes with this basic machine (seriously someone needs to tell Bernina that the manual is a bit thorough.)

If you would like to sew the cover as I have sewed it: follow along for my updated pattern -- which includes the general idea of that designed by Sarah Hunter. Snaps to Sarah Hunter -- whoever she may be -- but this new and wholly different pattern is specific to fit the Bernina 1008.


Materials
To begin with let me just say that I just cut, I don't measure and I'm not exactly sure how much I started with.

- 1 yard of 44/45" fabric (I used quilted and I think a heavy-duty fabric is necessary.)
- Some matching thread, but don't panic if it doesn't match, I never do
- A shitload of bias tape

Instructions
I feel I should disclose that I am not a pattern writer, but I used to write instructions for software. This could be dry. Also I used a 1/2" seam allowance on all seams.

1. Measure and mark the following pattern pieces on the wrong side of your fabric (the fabric you intend for the body of the cover). Two pieces 15x13" (front and back panel), two pieces 16x8"(side pieces), two pieces 4x9" (top handle pieces).

2. Cut those and set aside.

3. Measure and mark the following pattern pieces on the wrong side of your pocket fabric (if you don't want contrasting pockets you don't need to.) One piece 13x13" (lateral slide pocket), one piece 10x15" (drop in pocket).

4. Cut those and set aside.

5. Get out that bias tape you're about to have some fun! Sew bias tape per generally accepted instructions (good luck with that) to one side of each of your pockets, the 13" side of the lateral pocket and the 10" side of the drop in pocket. Also sew bias tape along one of the 8" sides of the long side pieces. Lastly sew bias tape along one 9" side of each of the top handle pieces. Confused? Yeah, me too.

6. Pin pockets in place on panels lining up wrong sides of pockets with right sides of panels. Loosely stitch around edges.

7. Center the top handle pieces to the front and back panels with right sides together. Pin and then sew the top handle pieces to the center-top of both the front and back panels.

8. With right sides together, take care to line up and pin the side pieces to the bottom corners of the front panel on each side. Stitch from bottom to top along side and up around the corner so that the bias taped ends of the side panels meet and then overlap slightly on top of the top handle pieces.

9. Pin back panel to sides with right sides together and follow the same instructions of step 8.

10. With cover inside out, or not, try to pin the edges of the side panels on top of the short edges of the top handle pieces. Then sew what will appear to be a top stitch along the side of the bias tape that isn't already stitched down. This is a colossal pain in the ass and you'll feel like you're looking down a deep hole at your project while trying to sew it at the same time. Not a good time for a glass of wine.

11. With cover inside out, attach the bias tape to the bottom edge. Once you're ready to make the final stitch line of the bias tape it will be time to turn the cover right side out.

12. Iron. Now, if anyone could tell me how to get wrinkles out of pre-quilted fabric, that would be great.


copyright notice: I appreciate that these pattern instructions might suck ass, but they are not to be reproduced without my consent, nor sold without me getting a cut.

Monday, November 8, 2010

Busy


It's that time of year in which I don't sleep. I sew.

Last January a friend of mine requested an apron. And I -- can't believe I'm going to confess this -- put it on the backburner until now. It was totally an accident. You know how it goes, "I'll start that just as soon as I finish this order." Then the next invoice comes and you don't do it, but you say, "I'll start that just as soon as the pool closes." Then the weather gets chill and you're still not even started, you gasp, "Oh gosh, I have to do my Halloween costumes, first." Next thing you know, the gal turns 40 and you're faced with a deadline.

Good things happen when I'm under deadline, that's all I'm saying.

Sunday, October 31, 2010

Halloween 2010


I imagine that if I had daughters, my experience as a seamstress would be entirely different. New twirly skirts every week, lots of pretty dresses, and ruffles on everything. Don't even get me started on the custom bedding ideas.

But I don't have daughters, I have sons. And sewing for sons is just. not. the. same. When it comes to Halloween, however, my boys indulge me. I permit them to pick ANYTHING, and then I try to figure out how to create it. My oldest almost always picks something inspired by a LEGO mini-figurine. This year was no exception. He wanted to be the dementor from the Harry Potter set of LEGOs that was released some 10-15 years ago. (Those are grey and the ones released this year are black.)


My youngest wanted to be a mouse, specifically Jerry of Tom and Jerry fame. This I fretted over.

When needle came to thread, however, I found that the mouse costume was a piece of cake. The dementor costume was like a wedding dress. 10 yards of chiffon!

For the mouse costume I followed Simplicity 2506 -- which is a baby costume -- and altered it to fit my very big 4-year-old. I still could have added length in the crotch and legs, but the arms were perfect. The helmet/ears headdress thing was another story all together. My children have HUGE heads. I tried to accommodate this, and it was a little wonky. I think if I were to make this again I would follow an adult size balaclava pattern and just add ears. I also did not piece it together in the way Simplicity instructed. I elected to finish the sleeves and finish the body and then ease them into each other. I believe this makes for a much nicer fit. The pattern called for sewing the flat sleeve piece to the flat shoulder of the body pieces and then sewing a huge side seam that runs from wrist to ankle. Wonky!

The mouse in the pattern could just as easily pass for a monkey. But there is a monkey included in the pattern. I will hang on to this pattern, but my children will have outgrown it by next week. Maybe I'll have nieces and nephews who make a request from it. To Angelina Balerina fans, it would be a great base to put a tutu on. Very cute possibilities there.


For the dementor costume I followed Simplicity 2486. Biggest problem with this project was that it was an adult size pattern and I had to resize it and reshape it for my very skinny 5-year-old. That being said, his head is the same circumference as mine. The pattern called for 10 yards of chiffon. I knew I was in trouble when one of the pieces of the pattern instructed that I cut 12! Each layer has a lettuce-edge, rolled hem. This took hours. And about half way through the adventure it occurred to me that I could have done the entire thing raw edge. In fact, I would recommend this. That being said, this will last longer. But god-bless-it that took me a long time.

Were I to make this costume, again, I would make some fabric choice changes. I would create the first under layer (there are two) of knit. That would include the balaclava piece. Then I would pick varying shades of chiffon to layer. Otherwise all those layers and all that work is rather one-dimensional and looks a little bit like a burqa.

I feel fairly strongly that the pattern could be modified to create fairies and angels. Could really be a cool pattern to have in my stash.

Sunday, October 24, 2010

I Heart Babies


When I get word of a baby on the way, I get so excited. So for my dear friend Netti, her third child was reason for much planning and designing. I created a diaper bag with messenger bag styling.


The modern fabric inspired me to create one large compartment for all of her big items, I think her wish list included baby stuff, a laptop, and scriptures. Additional exterior pockets circle around the front and sides for organizing small items. These gusseted pockets can easily store mobile phones, drink bottles, diapers and wipes. And larger patch pocket under the flap is big enough for a file folder, magazine, changing pad, or even an extra set of clothes. A small fob and ring under the flap keep keys within reach (or pacifier), but out of sight.


The tough cotton webbing shoulder strap is long enough for across the body styling but also short enough for over the shoulder ease. The flap secures in place with a button and elastic closure and is enhanced with a stylish raw edge appliqué. This new, original design is available for custom order on my etsy site, if you want one too. But I'll try to get a few on there before the holiday season.

Wednesday, October 6, 2010

Yoga Mat Tote: Keep Calm & Carry On


The Carla Yoga Mat Tote bag can be slung comfortably across the body, allowing you to carry a yoga mat to and from class with style. Unique to this style are the hand-embroidered mantras -- show the world what you think with simple stitches. The tote holds a classic yoga mat and has an exterior pocket for collecting your car or locker keys, membership card, phone, and even wallets. The pocket has a flap and velcro closure for security.* The bag has a wide strap that resists rolling and folding, making for comfortable carrying. Great for any yoga or pilates enthusiast.

*Various pocket styles are available in this fabric palette. Please specify your preferences in the notes to seller when placing order. Dimensions: Circular bag that measures approximately 27" long and has about a 6-inch diameter. Care and Cleaning: Spot clean with cold water or dry clean. May be rinsed in cool water by hand and line dried, as well. Warm iron if desired. 100% Cotton. Sewn in my pet-free, smoke-free studio. Hand embroidery is for custom orders, only. Start conversation to learn more and for a more accurate quote.

Sunday, September 26, 2010

Interesting Inspiration


Smart and well-rounded. An interior divider creates a convenient 2 compartments for managing your essentials inside. This could be a versatile bag for young girls on the go, or for the sassy night on the town. I love the rounded shape and modern pleating in the front and back. Two sizes... just for fun.

I think you'll be seeing more of this style. I want to play with the pockets and the fabric combinations. The larger one pictures has a magnetic closure snap. And the smaller one pictures has a velcro closure (secured to the fabric with a smooth satin stitch).

Tuesday, September 21, 2010

Apples and Pears, In Pink

So, first I considering taking out all the pockets, and then I added extra ones. I baffled myself sometimes. Here is that same fav tote with double the pockets and yellow polka dots on the inside. Just to recap, this bag still has long handles and loads of room, yet it's still manageable as a carry-on or diaper bag. Two easy-access pockets on the outside, a few more inside.