Thursday, December 31, 2009

Clutch II


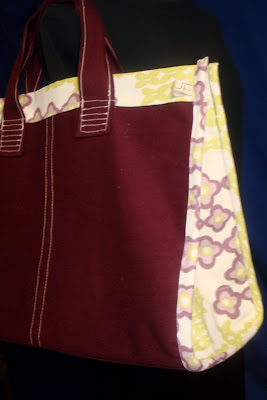
I liked it so much, I made it, again.
This time in Amy Butler Nigella -- home dec weight. Lined it with a 30s reproduction that I've had in the stash since.... well... since the 30s. Just kidding.


I have a friend with a birthday coming up. My next project will be for her... something for her yoga mat... and something in this fabric.

Wednesday, December 30, 2009

Clutch Deconstructed, Laurie Smith Fabric


OK... there's only about 8" left of my favorite Laurie Smith fabric. I've used it in so many projects, I simply love it. I love it paired with green, blue, and brown. Now that it is out of print, I will be sad to let it go.


I tackled the Amy Butler clutch, again. This time completely changing the pattern and making it more of a gigantic wristlet. I used a wood button for the closure and like the organic look it gives the fabric.

Wednesday, December 16, 2009

Over the Shoulder: Little Quilted Bag, Amy Butler with Modifications

I salivate every time I see an Amy Butler fabric. Even when I'm feeling like breaking up with her fabrics, I'm drawn to them. It's like that bad boyfriend you know you shouldn't talk to anymore, but you do. So... When I needed a gift for the babysitter I decided to turn to my stash of Amy Butler fabrics and a pattern in In Stitches -- her best pattern book for adults.

I've always wanted to try the quilted bag, but knew the size was a little awkward. I also knew the process of pieces a quilted bag was not interesting to me -- time sucker. But then I decided to make it without piecing. This wasn't pretty easy to do. But I struggled with the corners and I strayed from the pattern to make a lining.

Here's how it turned out. Hopefully the Vera Bradley fan who is our babysitter will be satisfied with it.


I think next time I'll use piping around the side panels. It would help stiffen the edges.

Sunday, December 13, 2009

Custom Order: Ambiguous Superhero

It feels like Santa's workshop around here. I'm putting the finishing touches on quite a few gifts for my own family and friends. And I've had a few orders. One in particular was fun for me because I have boys... and it is for a smart little boy. The request -- a superhero cape, not any one in particular, but in his favorite color: blue. Now that, I can do.

It's reversible and has a simple tie at the neck. The gathering is pretty tight to allow a full wingspan effect. It's just longer than fingertip length. Could double as a magician's cape.

I predict the superhero this cape will adorn will wear it 13 years from now as he is crowned Mr. Skyline. (Inside joke for those of us that graduated from Skyline High School.)


Tuesday, December 8, 2009

Seasonally Appropriate: Christmas Stockings

I just finished a custom order for Christmas stockings. They'll be heading to Texas tomorrow. But I think I'm going to miss them. This unique project required that I use existing needlepoint stockings -- much like you might buy from Land's End or Horchow. They were rather small, so I needed to extend them while still making the needlepoint look like a natural part of the stockings. Or rather, make the addition look like part of the original stocking.

I also knew the client wanted to class up her stockings. Needlepoint stockings are classic, but I knew she wanted something with pow. Hope these are what she had in mind...


Notable notions:
vintage buckle
interior design trim that was priced $8/yard. (that's much more expensive, higher-quality than I am accustomed working with)
handmade button "believe"
stretch velvet -- to accommodate big stocking stuffers
microfiber suede, leather look

Thursday, November 26, 2009

Costume: Pink Revisited


I guess you thought posts about Halloween costumes were done. Nope. Not at all. We love costumes all year long. Plus, I finished this one at the eleventh hour, just in time for Halloween.


It was another pink monster. Same pattern. Some of the same materials. But a few changes and use of an amazingly high-quality sheer for the sleeves. (Got it as a remnant.)


I'm still struggling to effectively hem a circle skirt -- which this almost is. Any hints? It's just so hard to keep it level and not allow it to bunch, pucker, and fold.

PHOTO NOTE: Also, I know these photos are assy. I keep promising myself I'll make an effort to take better pictures. But then I wouldn't have time to sew. So, you know... assy pictures.

Thursday, November 19, 2009

Over the Shoulder: Biggest Bag Ever


I keep returning to those bags. Which is silly, because my to-do list is betting longer and I'm not really doing anything at the top of it.

But I have enjoyed giving some bags to some of my friends. And selling some on Etsy, too. This one was practice in hair of the dog, or getting back on the horse, or facing the needle that pierced your pinkie.


Technically it's not the BIGGEST bag I've ever made. (That would be the Anita bag.) But it is awfully big and perfect for hauling towels to swimming lessons or lugging books back to the library, or schlepping diapers to a playdate. Great for many uses.

I did make lots of notes for myself on what to do differently. But I followed very few of my own instructions. Makes me wonder why I even make notes for myself. I did, however, use contrast fabric rather than duck cloth in the side panels. And I was happy with that. Though, I might like a little more contrast.

Thursday, November 12, 2009

Over the Shoulder: Versatile Carryall


Gigantic. Everyone needs at least one bag that they can fit everything in. This is it. Simple construction allows you to dump everything from school supplies to overnight needs. I had a few depression-era reproductions that I wanted to tie together for a nice carryall that was sturdy enough to stand up on its own. Perfect accompaniment for a road trip or a shopping spree.

The closure is a length of twill tape and wraps around a large self-covered, shank button.


Thursday, November 5, 2009

Costume: Red Cape


My children LOVE costumes. I find that most children love costumes. Not just on Halloween, but every day of the year. Some parents permit it -- I among them -- others suppress it. Sometimes my kids just want a boost of confidence, delivered in no better way than a cape. When I find a remnant of shiny, crazy, flocked, or shimmery fabric, I snatch it up. I know it can become something, even if that something is nothing more than a cape.


Capes are magical in their effortless ability to transform the courage of kids. For this particular cape I rounded off the corners then attached bias tape around 3 sides of it (the short ends and around the curved corners across the bottom). Then I used my ruffler across the non-taped side. I actually varied the tightness of the gather -- making it much tighter through the center section of the cape. This helps it drape more naturally around the shoulders.

It's a shorter cape than I have made in the past. But already loved and in use. (PS -- a great stash basher if you know a toddler with a thing for costumes.)

Sunday, November 1, 2009

A Day Late and Ridiculous Pose

Well, I know I promised I'd post a picture of the other thing I made for Halloween, on Halloween. Then I saw the picture and thought I looked like the biggest dork (my husband is notorious for taking unflattering pictures of me). I balked and was afraid. But a promise is a promise and I always want to share the fabulousness of this coat. Vintage velvet coat with white silk lining. Truly inspiring. I borrowed from my friend's mother (who is now 79) -- who wore it every year on Halloween for her children and their friends' costume parties.

The gold embroidery on the lapels is very thick and the whole thing is still soft after about 40 years of use.

But what I made was the simple little satin skirt you see poking through the coat. Great pattern and I recommend it. I'll be making a non-Halloween version, soon. The pattern is an easy-to-sew from Simplicity, 4036. It's zippered and has a nice rise, but no waistband. The length is intended to be below or at the knee. But I shortened it quite a bit for the Halloween version. Only because I wanted to show off my spiderweb tights, not because I'm a slut. Believe me, anything but.

Thursday, October 29, 2009

Costume: LEGO Castle Guy


Happy Halloween! Well, almost. And as you know by now, I've been making all kinds of costumes and having a great time doing it. This one is for a 4 1/2 year old boy who wanted nothing more than to look like the LEGO Castle guy. That is how I found myself make costume pattern simplicity 5520. I have now made 3 of the 4 options.


This was my first time sewing this plastic/vinyl stuff. Was pretty easy to work with, expect for the part where you can't use an iron, nor pins. But I did use a lot of cello tape and managed it just fine. There is "warm and natural" quilt batting inside and scraps from a sheet on the back.


The tunic is made from velvet and the chain is a synthetic fabric we found at a local fabric store. It was a little like working with pantyhose and runs easily. I made all seams with my serger's rolled hem.

PS -- I even made something for myself. See it here, first, on Halloween.

Thursday, October 22, 2009

Over the Shoulder: My Take on a Market Bag


I am a sucker for the craft magazines at most fabric stores. Recently I fell head over heels for a Better Homes and Gardens "Bags, Pillows & Pincushions issues. All the projects are insanely easy and I have to say I've enjoyed one in particular -- the market bag. There were a few things I had to change, of course. But the basic directions were easy to sew and made a tote that is roomy enough for a day out with the kids. It's also a great stash basher and I feel I could modify it to use more of these scraps. This time around, however, I used scraps from this project.


If you can come up with 24, 5" squares and a little bit of fabric for the sides, handles, and inside... you should do it, too. If you do it, take my advice... make some of the following changes:

1. Don't pleat the lining. The pattern calls for the lining to have a pleat (just as is done on the outside). This makes for a very bulky lump in the middle of the bag. So, when you cut your lining, just eyeball a top that is 1 1/2" narrower than the original (that's 3/4" on each side). You'll be much happier.

2. Try using twill tape in the handles for support (rather than batting). I can already tell these will be a little stretchy for heavy loads. Looks nice all quilted, but I think I like non-stretchy, sturdy innards for my handles. (And yes, I'm the type of gal that uses innards in conversation.)

3. To stiffen the pleats and ensure they will stay where you want them, go ahead and stitch them in place. I did this by stitching where it was folded (on the inside) and hidden inside the pleat. I only stitched about 2 inches down from the top, but it did help keep the pleat crisp. You could further this technique/look by stitching down the pleat with a nice contrasting thread and making it much the same way you would a kick pleat in a skirt -- which for the record I have never done.

4. Lastly, add pockets to your interior before sewing it in. The pattern doesn't call for any. But every good tote needs a pocket, even if it is a simple patch pocket.

If you do decide to make this bag, I have a few 5" squares I'd be happy to donate to the cause, just let me know -- Via comment -- and I'll ship them off. Of course, you have to promise to send pictures of your finished tote.
PS -- When I showed this to my husband he said, "Oh, very nice. Is it a Halloween purse?" Men!

Thursday, October 15, 2009

Pear Shaped


I didn't set out to make a purse with my silhouette. But that I have. Using just a few scraps of Laurie Smith home dec fabric I created this small pouch. It's harvest gold inside and screaming orange outside.


The closure is a button and hair elastic-band. The handles and edging are self made bias tape. All in all, I think the weight of the fabric helps the shape of the purse -- even if it does resemble my rear end.


PS -- Please don't take note of my freakishly whack-a-do thumb. My heavens, what was I doing?!?!?

Thursday, October 8, 2009

Sweet Dreams


Late nights and gifting are my signature. About 24 hours before my son's 3rd birthday I decided to sew 4 pillowcases for him. I experimented with quite a few measurements for these. I made wide bands and narrow bands and piping and flanges. Trying to decide what I liked best. I made one of them king size, one queen size, and two at about 28" long -- not sure what size that would classify as.

They are hideous, really. Nothing designer, innovative, or eye-catching. But he likes them, and it gave me lots of practice on my serger. Also, nothing bashes a stash like a few pillowcases. Now, I think I'll make a few of these in holiday fabrics and create a tradition of them. Halloween for the week before Halloween. Christmas for Christmas Eve (to help you dream of sugar plums, of course). Oh, I could have fun with these.

Also I can never resist purchasing novelty fabrics. But when I get them home I don't really like them in quilts or in clothing. So, found something I didn't mind having them on.

Thursday, October 1, 2009

Inspired by 50% Off


I had the pleasure of hitting on of my favorite fabric shops this week, in the company of one of my favorite blog authors. We rummaged through trims and piles of sample cuts looking for the bargains we just couldn't leave behind. She found some bright orange duck cloth. Did I mention bright orange. It was insanely happy and cute. Really, orange is cute. And then she found another. Of course I snatched it up and was all the more influenced by the 50% off sticker.


But what to do with orange? I knew there was a tote I needed to make -- a gift bag for a friend's 40th birthday present. So, I started staring down that orange. Guess what? I paired it with some other fabric that I found in the "by the pound" bin and voila,the Two Handle Tote.


This tote does not earn its name from the sassy orange and green ribbons you use to carry it. It can carry two handles of liquor. It was the first pattern I can say I truly noodled over, drew, and then re-measured before cutting away. Usually when I make something up I start whacking at the fabric and fidget with the results at the machine. But this time I planned ahead. Finished it is 6"x9"x13". A perfect martini bar in a bag.

PS -- Happy October with this orange, right?