Monday, November 10, 2008

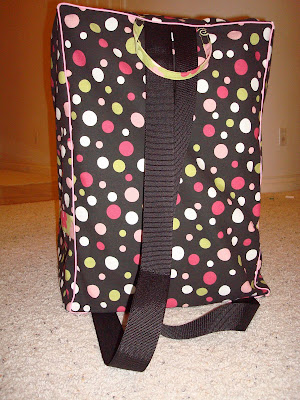
Anita Nap Mat Bag


This is the "Anita" bag, custom designed to carry two very large nap totes. It's about 25 inches high and 18 inches wide (and deep). Wide webbing backpack straps and self-made handle for carrying. 36 " long separating, dual-action zipper permits easy access to LARGE items. Might also work to carry some carseat models.

Friday, November 7, 2008

Sunny Salutations Yoga Tote


Modified version of Amy Butler's free yoga bag pattern. But changed the top and the pocket to fit my needs. Do like the handle, however, and know it will work as a sling style. Laurie Smith fabric.

Hoop It Up Tote


This little number is lined with the same circle fabric. (Not very original.) Measures about 15 by 13... or so. Could accomodate a laptop, or just a few of the essentials. No pockets, just a good 'ol tote. I think next time I'll try to use my fancy new chain stitch feature on my serger to create a contrast stitch on the top edge.

Da Muddah Bag -- It's Huge


Thursday, October 30, 2008

Nap Time Tote: Girls Only

I've made a few naptime totes in my day. I love them. I wish I have known how to make them when I had little babies. But my little guys rarely take naps anymore... so obsolete. But it's my baby gift. That is to say when I hear someone is having a baby I always think, "How can I update the naptime tote for them??!?!"

This one is very girly, but not in pink. I might make myself a scarf out of this fleece, it's great. Got the fleece on clearance at Hobby Lobby (of all places) and the polka dot fabric was just a pick up. You can get it just about anywhere, I've seen in everywhere from WalMart to Hobby Lobby to JoAnn's.

This time I made the pockets a bit smaller and I divided them with a seam down the middle. I think they'll accomodate diapers and sippy cups better that way.


Saturday, October 25, 2008

Kimono Style PJs: Amy Butler Pattern


Here is one of my favorite fabrics fashioned into baby clothes. This is from a new book by Amy Butler, Amy Butler's Little Stitches. I don't really have babies anymore, but big boys, so I can't really use the patterns for myself. But I thought it would be a nice book to get so that I can make gifts for folks.

The fabric is from JoAnn's and I think it's called Mocha by Alexander Henry. I've used it before for a skirt. And I've seen it as a yoga bag from Lucy apparel. So, going big time, I guess.

The pattern itself was a little wonky and I completely diverted from the path and had to start winging it on one of the closures. But the bias trim is a nice touch. I felt the trim around the bottom of the kimono jacket and the bottom of the pants could have been patterned to look more finished (on the inside). But, it'll do.

This is the 6-9 month size.

Mini Me Aprons: Jillaroo, too and x-mas mini

I made these mini aprons to match these aprons.These are headed to an area art market. I've got to sew at least one thing a day to get ready for it. I've never done anything like this -- actually sold anything -- so it will be a learning experience. If nothing else I will bash my stash.


Warm and Cozy Baby Burrito Wrapper

Here's an adaptation on the naptime tote. This time, no handles. I only wish I had a baby to wrap in this. Guess I'll have to sell it or gift it. We'll just see.

Sunday, October 5, 2008

Mini Me Aprons

I made two more aprons. These were for a pair of sisters (my cousins). One is a tween and the other 2. Here I am pictured (being remarkably silly at that) in one of the aprons because my Aunt -- who is my husband's age -- asked me to pose with her youngest daughter.


The aprons were the same Butterick pattern, but just another version, as the Christmas apron and Jillaroo apron I made earlier this week. I love these because they are completely reversible. They are a little flouncy and not the type of apron I personally would like to wear (because I have me some child bearin' hips).

Thursday, October 2, 2008

Overlock Project: 2 Aprons

I know what you're thinking... does she even sew anymore. Well, I have been slowing down because I've taken a break to get acquainted with my new Bernina Overlock/Coverstitch Server. (It's wonderful.)

I took a few mastery classes and I've been trying to practice everything we learned in class. Now I'm really starting to understand where I can use it to improve my sewing projects. I just finished two aprons and to attach the ruffle I used an overlock stitch (but no cutting edge). I also put my ruffler foot to use. Those are useful, but I'm still learning how to judge how gathered to make pieces and still work with a pattern.

The fabrics are pretty old, not sure what some of them are. The red is a moda (I think) and I think it's called Little Christmas. I have no idea where the cowboy fabric came from, but it was about $1 a yard (I kept the tag). The Christmas print is an Alexander Henry and it was $1 a yard at Hancock Fabric in Idaho Falls. I'm telling you those small towns clearance fabrics that are absolutely gobbled up around here.

These are headed to an area art market. I've got to sew at least one thing a day to get ready for it. I've never done anything like this -- actually sold anything -- so it will be a learning experience. If nothing else I will bash my stash.


Friday, September 5, 2008

Garden Tote: Lotta Jansdotter Pattern


I wish I could find a sew-along group for Lotta Jansdotter patterns. I love them. I have honestly enjoyed the finished product of every project I've tried from her book, Simple Sewing.

This project was the garden tote, I did make a few modifications to suit my needs. This is a great bag -- I'm already using mine on a daily basis -- to use outside the garden. It's perfect as a diaper bag because of all the outside pockets. Give it a try! Be warned, it's a big bag.

For materials I used duck cloth, a home dec fabric, and a little lightweight canvas (lining). I also used some twill tape, but It's aesthetic more than anything.

The pattern is easy to follow. The biggest change I made was that I added interior pockets (I always do) and I modified one of the outer, pleated pockets. The pattern calls for three pockets on each side. On one side I opted for two larger pockets, rather than three. I'm pleased with the effect (visually), but I'm very happy with the functionality.

I used the outer pockets to carry everything from water bottles to sippy cups to sunscreen. I love them because if something leaks it's not going to wreck everything inside the bag. Fabulous! I made this tote from under $3. All the fabrics were remnants, and all of pieces were scraps from when I had used the remnants on previous projects. All in all, very cheap with big impact.

I did not use duck cloth in the base piece. And I should have used it for at least one of the layers. It would give the tote better body.

PS -- Tote is featured on my flickr page: http://www.flickr.com/photos/23380408@N03/2831635019/in/photostream/

Pleated Sheers


I found occasion to use my serger, again. I'm trying to use it as much as possible because I've heard that if you use it alot in the first month you'll teach yourself to always think of how you can use it on projects that don't call for overlock but that could be improved with overlock.

My dining room really needed something to bring down its scale. I know that sounds weird... but it's a tall room with an enormous table and an enormous hutch in it. Every time I went in there I felt like the place echoed. Now, that being said, it's not a huge room, really. It was just tall and narrow. So, thought fabric might help.

I zipped these up (I have more to make when JoAnn's delivers my special order of 15 more yards) very quickly. It's a gauzy linen with black embroidery embellishment from the Tommy Bahama line (got it for 40 percent off with coupon). I used overlock to finish the top and bottom ends of each swath of fabric. Then I used blind hem to finish the sides. Then I used curtain pleater tape and drapery hooks to create the pinch pleats. This was a pretty simple process and very quick. I used blind hem, again, to finish up the bottom hem.

Wednesday, September 3, 2008

1st Overlock Project: Pajama Bottoms


I bought the Bernina. It is wonderful. I've only taken one mastery class (learning to make pleated drapes of all things) so I only know how to do the overlock stitch. I don't even know how to thread my own machine, yet. But the ladies down at the dealer are wonderful.

All I've made are these silly little PJ bottoms. It only took about two minutes. The serger is so fast. This is going to be fun getting to know this machine. I appreciate that these pants are not too impressive. But you should see the drapes I'm working on.

PHOTO NOTE: My son was not a willing model.

Saturday, August 16, 2008

Serger

Well, I've been given the green light on a serger. This is to say that my husband sees the value. I've really been wanting to sew some things for our home, but didn't want to spend the money on the a-maz-ing fabrics if it wasn't going to have that professional look that a serger gives projects.

Now, I've got to decide which serger to get. I'm leaning toward the Bernina 1300. But, it's kinda expensive. Oh. oh. oh. I get so paralyzed by perfection. It will be hard to choose one.

Friday, August 15, 2008

Summer Swap: Summer Holiday Sunset


OK OK OK OK... I've been such a slacker -- I guess that's summer for ya.
I got this phenomenal quilt in the mail from Leah at Pugglelogic. (We both participated in the Four Seasons Quilt Swap). She also sent along some goodies for me -- a fabric that represents her homeland of Australia and some gorgeous embroidery floss skeins. I am so grateful to her for putting such thought into this little art piece. She -- like me -- is a stay-at-home mom with young children. So I know the kind of effort it requires to first get to the sewing machine, let alone create something with zing.

The sunset she has created is peaceful and warm. Her stitching is great and I love how closely the quilting comes together in parts. It's really perfect. She also used a technique of laying another layer of fabric -- almost like a two-sided flange -- onto the quilt to create surf. The dimension is just right (without getting all fussy). To me it just says, "Can I bring you another zombie?"

I don't know how she did it, but she created something that resonates with me and my personality.

Thank you Leah! You're a gem.

Monday, August 4, 2008

Tunic, Amy Butler Pattern

I'm not going to brag or anything, but I won a pattern. An Amy Butler pattern! I finally sat down to sew it up and here's how it turned out:


Now if you can ignore the lack of ironing (I'm really bad about such details) you'll see that it actually fits me. I consider this an absolute triumph -- as patterns hate me -- and my husband actually said, "It's cute." (He might have learned a lesson in diplomacy after my last project.)

Here's what I estimate I spent on the project:

Pattern = free (Thank you finny and donk sew along)
Amy Butler fabric = about $14 -- I used about 1 5/8 yards and I paid about $8 a yard
Lining fabric = about $2 -- again, I didn't use much and I bought the symphony broadcloth at joann's for $1/yard
buttons = $1.60
thread = I had some

TOTAL = in the neighborhood of $18

Here's a few thoughts I have about the pattern itself.

1. It's pretty simple if you're not simple minded. I myself had a simple-minded, if not absent-minded, moment in which I thought the front was the back and the back was the front. So, I couldn't get my pins to all line up. But it was midnight and I was a little tired -- in my defense. After a good night's sleep the problem became painfully obvious to me and I whipped out the rest of the tunic in minutes.

2. The neck, or yoke, or collar, or whatever you'd want to call it could be assembled in an easier way, I think. I think it would be easier to iron 1/2 inch allowance around the bottom of it, before you sew it on. Then just sandwich the tunic body in between the two layers of the yoke. Just a thought... if you're going to try it.

3. Sizing is great with Amy Butler. There are none of the usual problems with patterns... high waist, too short, etc. But I did envision that the yoke would cover a bit more of my arm. I made the cami from the pattern, but I think it's plenty long. I think I'll try the dress of this pattern, next.

4. I didn't even bother with the flower brooch and belt that is outlined and accounted for in cutting instructions and materials. I'm just not that kind of girl. But I do think I'll make the flower brooch eventually, perhaps for something else, like an embellishment on a tote bag.

Friday, July 25, 2008

Making It Up: McCall's 5591


Well, it took me three months (or more) to finish this skirt. I'm not sure I love the end result but there are reasons for that:

1. I fell in love with a chambray skirt in the JCREW catalog and tried to replicate. Well, we all know that knock-offs still feel like knock-offs -- even when perfectly executed.

2. Whenever I think things like, "...sometimes a pattern makes things more simple..." I am setting myself up for disaster.

3. Patterns hate me. I've said it before, and I'll say it, again. My body must be an absolute anomaly of science because patterns always have to be altered, drastically to make them fit. In the case of this pattern I literally just started chopping new pieces of fabric and sewing them on willy-nilly to make a waistband that wasn't 4 inches short of reaching around my middle.

If you have a normal body, you might want to try this pattern. It is McCall's M5591. It was challenging, but not impossible. Mostly just fidgety. I had to do a lot of tucking, pleating, ironing. Oh, and there's a zipper. But, I didn't think the zipper was nearly as hard as the waistband itself. I did stray from the pattern for the waistband. The pockets were a cinch (I'd heard pockets can be a bear). I didn't mess with the belt loops and sash, but that's just not my style. It only takes about 2 yards of fabric and a zipper... so possible to make it from stash fabric.

PS -- When I showed it to my husband he said, "It's (insert awkward hesitation) modest."

Wednesday, July 16, 2008

This One is GOOD


I love bread. I mean, I really love it. Today I made both banana bread and a new white bread recipe that is great. The white bread recipe was from the SAF yeast Web site and a bit different than the usual white bread recipe that I follow. You should try it!

Tuesday, July 15, 2008

Magic Poncho Becomes Magic Swim Cover Up

Lightening does not strike twice. Specifically the creativity bolt. Last month's assignment in the Finny and Donk Sew Along brought me a prize (a yummy Amy Butler pattern for a cami/tunic/dress thingy). This month's assignment was meant to be from the child gifts chapter of Hoverson's book. I loved the magic poncho. But we live in an arid climate and I couldn't really see us ever using a poncho. Soooo, I reworked it to be a swim cover up and made it out of a beach towel.

Sunday, July 13, 2008

Strawberry Bread, Always in Season


Partly because I'm tired of banana bread and partly because I'm trying to eat less of them (seeing as how they are shipped from sooooo far away) I opted for Strawberry Bread this week. I like it, it's moist, and the boys gobbled it up. That being said, it doesn't last as long as banana bread and I prefer the texture of my stand-by banana bread recipe. But here's one to try if you have a bunch of strawberries on hand in the coming weeks (they are coming into season I suppose).

Strawberry Bread as published in Always in Season by the Junior League of Salt Lake City, Utah

Ingredients:
3 cups flour
2 cups sugar
1 teaspoon baking soda
1/2 teaspoon cinnamon
1 teaspoon salt
4 eggs
1 1/4 cups vegetable oil
2 cups sliced fresh strawberries (the smaller the slice the less mushy the bread will be)

Mix the flour, sugar, baking soda, cinnamon, and salt in a large bowl. Add the eggs, oil, and strawberries; mix just until moistened.

Spoon into 2 greased and floured (I actually didn't flour mine and they came out fine) loaf pans. Bake at 350 degrees for 1 hour and 10 minutes. Cool in the pans for several minutes; remove to wire racks until cool completely.

Friday, July 11, 2008

Save the Quilts

I was at my grandmother and grandfather's cabin a mere 4 minutes when I picked up my camera and started taking pictures of stuff. Stuff that was discarded from their primary home, their vacation home, and anyone else's home in the family that had cast offs they didn't want to use anymore. Assembled in this jumbled way the cabin has always had a decor that we've teased and laughed about. But this trip I realized there were some true family treasures up there. Because I'd read about someone's obsession with vintage sheets recently I pulled back the blankets on every bed and took a peek. Sure enough vin-tage! But threadbare, as well. What caught my attention were the quilts I found.
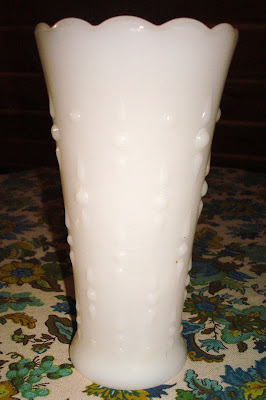
Anyway, here are the pictures.... and a vase to boot.
There were four precious ones that I couldn't stop thinking about. Partly because the conditions of the cabin are far from archival and partly because I knew my great-grandmother had pieced or quilted them. Now that I myself have pieced and quilted a few quilts I know the time that went into the planning, piecing, quilting, binding, etc. I felt very strongly the quilts must be saved.

Presumably each quilt/blanket belongs to members of our family (none of them to me or my mother). I didn't know if they knew there were up there and the way they were being used. So of course I campaigned to my grandmother to save them. In long discussions -- most of which I think we misunderstood each other -- I think I succeeded in convincing her that the quilts needed to be restored and saved in another way than at the cabin. One is actually covered and then -- it kills me to say this -- tied together to make a newer blanket. When I brought this up to my grandma, wanting to know the full story, she told me it was her wedding quilt that was inside! O.M.G.


Tuesday, July 8, 2008

Inspired, Naturally

A few more pictures to remember and provide inspirate for future projects. These are from the cabin, too. But these are the scene I went gaga over in nature. Well, except for that fantastic mid-century chair and table. Oh and the tablecloth that is hiding a cable reel (as table). I love the fabric in the tablecloth. I have a close-up of that vase. But you'll have to wait until tomorrow.


Monday, July 7, 2008

Some Vintage Inspiration

My grandparents have a cabin in the woods of Island Park, Idaho. It's remote by my standards and is dreamy. I had a sewing deadline to fulfill while I was on family vacation, so I was able to sit on the front porch of the cabin and sew. Simply great! As I looked around the cabin -- which has been their's for about 40 years -- I found many little vintage items that inspired me for future projects. (I'll be posting these little treasures all week, so check back.)

1. The quaint canisters that have been in this cabin for as long as I can remember. I heart birds.

2. The plates we use when we're there. According to my grandmother, she purchased them with S&H green tickets or something.

3. Milk Glass. All over the place and perfect. Oh yummy. I'll post a few pictures over the next couple of days. Even the light fixtures up there feature it. It's wonderful, and precious.


5. The doll. This doll is so cute. Just flip it over to find a new girl under the skirts. I love it. I especially love the green plaid. It's great and I suspect it was used for something really cool before it became the scraps used for the doll's dress. Bottom's up!

PS -- I also learned while I was on vacation that I had been picked as a winner in the Finny and Donk's Sew Along. I was so flattered. So, go check out my winning skirt! (My prize arrived today -- an Amy Butler pattern for a tunic/dress/cami!!!)