"You never forget a beautiful thing you've made." My Life in France, Julia Child
Thursday, October 29, 2009
Costume: LEGO Castle Guy
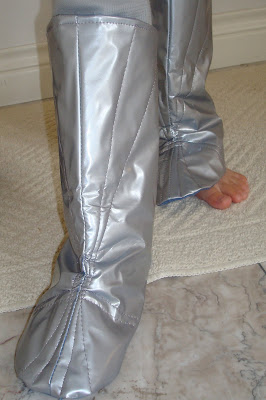
Happy Halloween! Well, almost. And as you know by now, I've been making all kinds of costumes and having a great time doing it. This one is for a 4 1/2 year old boy who wanted nothing more than to look like the LEGO Castle guy. That is how I found myself make costume pattern simplicity 5520. I have now made 3 of the 4 options.
This was my first time sewing this plastic/vinyl stuff. Was pretty easy to work with, expect for the part where you can't use an iron, nor pins. But I did use a lot of cello tape and managed it just fine. There is "warm and natural" quilt batting inside and scraps from a sheet on the back.
The tunic is made from velvet and the chain is a synthetic fabric we found at a local fabric store. It was a little like working with pantyhose and runs easily. I made all seams with my serger's rolled hem.
PS -- I even made something for myself. See it here, first, on Halloween.
Thursday, October 22, 2009
Over the Shoulder: My Take on a Market Bag
I am a sucker for the craft magazines at most fabric stores. Recently I fell head over heels for a Better Homes and Gardens "Bags, Pillows & Pincushions issues. All the projects are insanely easy and I have to say I've enjoyed one in particular -- the market bag. There were a few things I had to change, of course. But the basic directions were easy to sew and made a tote that is roomy enough for a day out with the kids. It's also a great stash basher and I feel I could modify it to use more of these scraps. This time around, however, I used scraps from this project.
If you can come up with 24, 5" squares and a little bit of fabric for the sides, handles, and inside... you should do it, too. If you do it, take my advice... make some of the following changes:
1. Don't pleat the lining. The pattern calls for the lining to have a pleat (just as is done on the outside). This makes for a very bulky lump in the middle of the bag. So, when you cut your lining, just eyeball a top that is 1 1/2" narrower than the original (that's 3/4" on each side). You'll be much happier.
2. Try using twill tape in the handles for support (rather than batting). I can already tell these will be a little stretchy for heavy loads. Looks nice all quilted, but I think I like non-stretchy, sturdy innards for my handles. (And yes, I'm the type of gal that uses innards in conversation.)
3. To stiffen the pleats and ensure they will stay where you want them, go ahead and stitch them in place. I did this by stitching where it was folded (on the inside) and hidden inside the pleat. I only stitched about 2 inches down from the top, but it did help keep the pleat crisp. You could further this technique/look by stitching down the pleat with a nice contrasting thread and making it much the same way you would a kick pleat in a skirt -- which for the record I have never done.
4. Lastly, add pockets to your interior before sewing it in. The pattern doesn't call for any. But every good tote needs a pocket, even if it is a simple patch pocket.
If you do decide to make this bag, I have a few 5" squares I'd be happy to donate to the cause, just let me know -- Via comment -- and I'll ship them off. Of course, you have to promise to send pictures of your finished tote.
PS -- When I showed this to my husband he said, "Oh, very nice. Is it a Halloween purse?" Men!
Thursday, October 15, 2009
Pear Shaped
I didn't set out to make a purse with my silhouette. But that I have. Using just a few scraps of Laurie Smith home dec fabric I created this small pouch. It's harvest gold inside and screaming orange outside.
The closure is a button and hair elastic-band. The handles and edging are self made bias tape. All in all, I think the weight of the fabric helps the shape of the purse -- even if it does resemble my rear end.
PS -- Please don't take note of my freakishly whack-a-do thumb. My heavens, what was I doing?!?!?
Thursday, October 8, 2009
Sweet Dreams
Late nights and gifting are my signature. About 24 hours before my son's 3rd birthday I decided to sew 4 pillowcases for him. I experimented with quite a few measurements for these. I made wide bands and narrow bands and piping and flanges. Trying to decide what I liked best. I made one of them king size, one queen size, and two at about 28" long -- not sure what size that would classify as.
They are hideous, really. Nothing designer, innovative, or eye-catching. But he likes them, and it gave me lots of practice on my serger. Also, nothing bashes a stash like a few pillowcases. Now, I think I'll make a few of these in holiday fabrics and create a tradition of them. Halloween for the week before Halloween. Christmas for Christmas Eve (to help you dream of sugar plums, of course). Oh, I could have fun with these.
Also I can never resist purchasing novelty fabrics. But when I get them home I don't really like them in quilts or in clothing. So, found something I didn't mind having them on.
Thursday, October 1, 2009
Inspired by 50% Off
I had the pleasure of hitting on of my favorite fabric shops this week, in the company of one of my favorite blog authors. We rummaged through trims and piles of sample cuts looking for the bargains we just couldn't leave behind. She found some bright orange duck cloth. Did I mention bright orange. It was insanely happy and cute. Really, orange is cute. And then she found another. Of course I snatched it up and was all the more influenced by the 50% off sticker.
But what to do with orange? I knew there was a tote I needed to make -- a gift bag for a friend's 40th birthday present. So, I started staring down that orange. Guess what? I paired it with some other fabric that I found in the "by the pound" bin and voila,the Two Handle Tote.
This tote does not earn its name from the sassy orange and green ribbons you use to carry it. It can carry two handles of liquor. It was the first pattern I can say I truly noodled over, drew, and then re-measured before cutting away. Usually when I make something up I start whacking at the fabric and fidget with the results at the machine. But this time I planned ahead. Finished it is 6"x9"x13". A perfect martini bar in a bag.
PS -- Happy October with this orange, right?
Subscribe to:
Posts (Atom)